14. SpringBoot3+Vue3实现富文本编辑器功能
wangeditor5官网
安装wangeditor5
npm install @wangeditor/editor --save
npm install @wangeditor/editor-for-vue@next --save
引入和使用 wangeditor5
import '@wangeditor/editor/dist/css/style.css' // 引入 css
import {onBeforeUnmount, ref, shallowRef} from "vue";
import { Editor, Toolbar } from '@wangeditor/editor-for-vue'
初始化(表单中)
wangEditor 5 富文本字段可以直接和form中的字段使用v-model进行绑定
<div style="border: 1px solid #ccc; width: 100%">
  <Toolbar
      style="border-bottom: 1px solid #ccc"
      :editor="editorRef"
      :mode="mode"
  />
  <Editor
      style="height: 500px; overflow-y: hidden;"
      v-model="data.form.content"
      :mode="mode"
      :defaultConfig="editorConfig"
      @onCreated="handleCreated"
  />
</div>
/* wangEditor5 初始化开始 */
const baseUrl = 'http://localhost:9090'
const editorRef = shallowRef()  // 编辑器实例,必须用 shallowRef
const mode = 'default'
const editorConfig = { MENU_CONF: {} }
// 图片上传配置
editorConfig.MENU_CONF['uploadImage'] = {
  server: baseUrl + '/files/wang/upload',  // 服务端图片上传接口
  fieldName: 'file'  // 服务端图片上传接口参数
}
// 组件销毁时,也及时销毁编辑器,否则可能会造成内存泄漏
onBeforeUnmount(() => {
  const editor = editorRef.value
  if (editor == null) return
  editor.destroy()
})
// 记录 editor 实例,重要!
const handleCreated = (editor) => {
  editorRef.value = editor
}
/* wangEditor5 初始化结束 */
在表格里查看富文本内容
<el-table-column label="内容">
  <template #default="scope">
    <el-button type="primary" @click="view(scope.row.content)">查看内容</el-button>
  </template>
</el-table-column>

<el-dialog title="内容" v-model="data.viewVisible" width="50%" :close-on-click-modal="false" destroy-on-close>
  <div class="editor-content-view" style="padding: 20px" v-html="data.content"></div>
  <template #footer>
    <span class="dialog-footer">
      <el-button @click="data.viewVisible = false">关 闭</el-button>
    </span>
  </template>
</el-dialog>

const view = (content) => {
  data.content = content
  data.viewVisible = true
}

data: {
  viewVisible: false,
  content: null
}
富文本对应的后端文件上传接口
文件上传要求按照下面的格式来 提供
/**
* wang-editor编辑器文件上传接口
*/
@PostMapping("/wang/upload")
public Map<String, Object> wangEditorUpload(MultipartFile file) {
String originalFilename = file.getOriginalFilename();
if (!FileUtil.isDirectory(filePath)) {
FileUtil.mkdir(filePath); // 创建一个 files 目录
}
// 提供文件存储的完整的路径
// 给文件名 加一个唯一的标识
String fileName = System.currentTimeMillis() + "_" + originalFilename; // 156723232322_xxx.png
String realPath = filePath + fileName; // 完整的文件路径
try {
FileUtil.writeBytes(file.getBytes(), realPath);
} catch (IOException e) {
e.printStackTrace();
throw new CustomException("500", "文件上传失败");
}
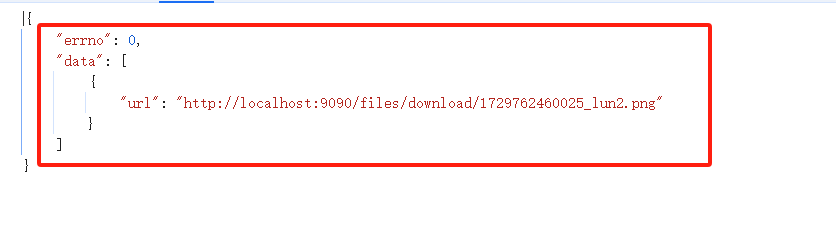
String url = "http://localhost:9090/files/download/" + fileName;
// wangEditor上传图片成功后, 需要返回的参数
Map<String, Object> resMap = new HashMap<>();
List<Map<String, Object>> list = new ArrayList<>();
Map<String, Object> urlMap = new HashMap<>();
urlMap.put("url", url);
list.add(urlMap);
resMap.put("errno", 0);
resMap.put("data", list);
return resMap;
}
外部引入 view.css (可选)
.editor-content-view {
    padding: 0 10px;
    margin-top: 20px;
    overflow-x: auto;
}

.editor-content-view p,
.editor-content-view li {
    white-space: pre-wrap; /* 保留空格 */
}

.editor-content-view blockquote {
    border-left: 8px solid #d0e5f2;
    padding: 10px 10px;
    margin: 10px 0;
    background-color: #f1f1f1;
}

.editor-content-view code {
    font-family: monospace;
    background-color: #eee;
    padding: 3px;
    border-radius: 3px;
}
.editor-content-view pre>code {
    display: block;
    padding: 10px;
}

.editor-content-view table {
    border-collapse: collapse;
}
.editor-content-view td,
.editor-content-view th {
    border: 1px solid #ccc;
    min-width: 50px;
    height: 20px;
}
.editor-content-view th {
    background-color: #f1f1f1;
}

.editor-content-view ul,
.editor-content-view ol {
    padding-left: 20px;
}

.editor-content-view input[type="checkbox"] {
    margin-right: 5px;
}
新模块:文章管理
创建数据库表article
CREATE TABLE `article` (
  `id` int(11) NOT NULL AUTO_INCREMENT COMMENT 'ID',
  `title` varchar(255) COLLATE utf8mb4_unicode_ci DEFAULT NULL COMMENT '标题',
  `img` varchar(255) COLLATE utf8mb4_unicode_ci DEFAULT NULL COMMENT '封面',
  `description` varchar(255) COLLATE utf8mb4_unicode_ci DEFAULT NULL COMMENT '简介',
  `content` longtext COLLATE utf8mb4_unicode_ci COMMENT '内容',
  `time` varchar(255) COLLATE utf8mb4_unicode_ci DEFAULT NULL COMMENT '发布时间',
  PRIMARY KEY (`id`)
) ENGINE=InnoDB DEFAULT CHARSET=utf8mb4 COLLATE=utf8mb4_unicode_ci COMMENT='文章信息';
开发后端接口
先创建实体类 Article, 直接复制 Admin 相关的 controller、service、mapper、mapper.xml 做一下修改即可
public class Article {
    private Integer id;
    private String title;
    private String img;
    private String description;
    private String content;
    private String time;
}
开发页面
<template>
<div>
<div class="card" style="margin-bottom: 5px">
<el-input style="width: 240px; margin-right: 10px" v-model="data.title" placeholder="请输入标题查询" prefix-icon="Search"></el-input>
<el-button type="primary" @click="load">查 询</el-button>
<el-button type="warning" @click="reset">重 置</el-button>
</div>
<div class="card" style="margin-bottom: 5px">
<el-button type="primary" @click="handleAdd">新 增</el-button>
<el-button type="danger" @click="delBatch">批量删除</el-button>
</div>
<div class="card" style="margin-bottom: 5px">
<el-table :data="data.tableData" stripe @selection-change="handleSelectionChange">
<el-table-column type="selection" width="55" />
<el-table-column label="标题" prop="title" />
<el-table-column label="封面">
<template #default="scope">
<el-image v-if="scope.row.img" :src="scope.row.img" :preview-src-list=[scope.row.img] preview-teleported style="display: block; width: 100px; height: 60px;" />
</template>
</el-table-column>
<el-table-column label="简介" prop="description" show-overflow-tooltip />
<el-table-column label="内容">
<template #default="scope">
<el-button type="primary" @click="view(scope.row.content)">查看内容</el-button>
</template>
</el-table-column>
<el-table-column label="发布时间" prop="time" />
<el-table-column label="操作" width="120">
<template #default="scope">
<el-button @click="handleUpdate(scope.row)" type="primary" :icon="Edit" circle></el-button>
<el-button @click="del(scope.row.id)" type="danger" :icon="Delete" circle></el-button>
</template>
</el-table-column>
</el-table>
<div style="margin-top: 15px">
<el-pagination
@size-change="load"
@current-change="load"
v-model:current-page="data.pageNum"
v-model:page-size="data.pageSize"
:page-sizes="[5, 10, 15, 20]"
background
layout="total, sizes, prev, pager, next, jumper"
:total="data.total"
/>
</div>
</div>
<el-dialog title="文章信息" v-model="data.formVisible" width="50%" destroy-on-close>
<el-form ref="formRef" :model="data.form" label-width="80px" style="padding-right: 40px; padding-top: 20px">
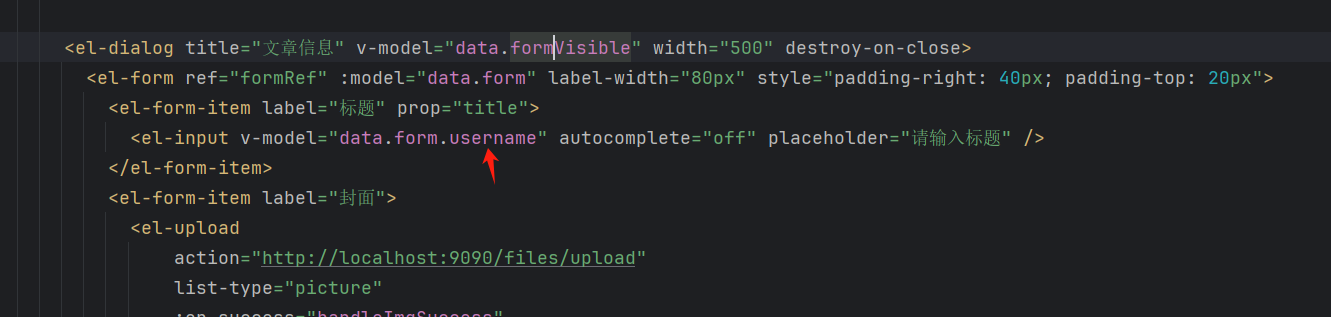
<el-form-item label="标题" prop="title">
<el-input v-model="data.form.title" autocomplete="off" placeholder="请输入标题" />
</el-form-item>
<el-form-item label="封面">
<el-upload
action="http://localhost:9090/files/upload"
list-type="picture"
:on-success="handleImgSuccess"
>
<el-button type="primary">上传封面</el-button>
</el-upload>
</el-form-item>
<el-form-item label="简介" prop="description">
<el-input type="textarea" :rows="3" v-model="data.form.description" autocomplete="off" placeholder="请输入简介" />
</el-form-item>
<el-form-item label="内容">
<div style="border: 1px solid #ccc; width: 100%">
<Toolbar
style="border-bottom: 1px solid #ccc"
:editor="editorRef"
:mode="mode"
/>
<Editor
style="height: 500px; overflow-y: hidden;"
v-model="data.form.content"
:mode="mode"
:defaultConfig="editorConfig"
@onCreated="handleCreated"
/>
</div>
</el-form-item>
</el-form>
<template #footer>
<div class="dialog-footer">
<el-button @click="data.formVisible = false">取 消</el-button>
<el-button type="primary" @click="save">保 存</el-button>
</div>
</template>
</el-dialog>
<el-dialog title="内容" v-model="data.viewVisible" width="50%" :close-on-click-modal="false" destroy-on-close>
<div class="editor-content-view" style="padding: 20px" v-html="data.content"></div>
<template #footer>
<span class="dialog-footer">
<el-button @click="data.viewVisible = false">关 闭</el-button>
</span>
</template>
</el-dialog>
</div>
</template>
<script setup>
import { reactive, ref } from "vue";
import {Edit, Delete, Search} from "@element-plus/icons-vue"
import request from "@/utils/request.js";
import {ElMessage, ElMessageBox} from "element-plus";
import '@wangeditor/editor/dist/css/style.css' // 引入 css
import {onBeforeUnmount, shallowRef} from "vue";
import { Editor, Toolbar } from '@wangeditor/editor-for-vue'
import '@/assets/view.css'
const data = reactive({
title: null,
tableData: [],
pageNum: 1,
pageSize: 10,
total: 0,
formVisible: false,
form: {},
ids: [],
viewVisible: false,
content: null
})
/* wangEditor5 初始化开始 */
const baseUrl = 'http://localhost:9090'
const editorRef = shallowRef() // 编辑器实例,必须用 shallowRef
const mode = 'default'
const editorConfig = { MENU_CONF: {} }
// 图片上传配置
editorConfig.MENU_CONF['uploadImage'] = {
server: baseUrl + '/files/wang/upload', // 服务端图片上传接口
fieldName: 'file' // 服务端图片上传接口参数
}
// 组件销毁时,也及时销毁编辑器,否则可能会造成内存泄漏
onBeforeUnmount(() => {
const editor = editorRef.value
if (editor == null) return
editor.destroy()
})
// 记录 editor 实例,重要!
const handleCreated = (editor) => {
editorRef.value = editor
}
/* wangEditor5 初始化结束 */
const view = (content) => {
data.content = content
data.viewVisible = true
}
const load = () => {
request.get('/article/selectPage', { // ?pageNum=1&pageSize=10
params: {
pageNum: data.pageNum,
pageSize: data.pageSize,
name: data.name
}
}).then(res => {
data.tableData = res.data.list
data.total = res.data.total
})
}
load()
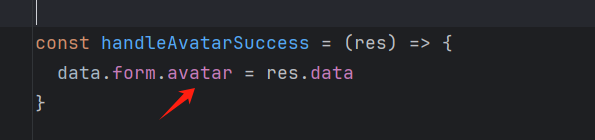
const handleImgSuccess = (res) => {
data.form.img = res.data
}
const reset = () => {
data.name = null
load()
}
const handleAdd = () => {
data.formVisible = true
data.form = {}
}
const save = () => { // 在一个保存方法里面做2个操作 一个是新增 一个是编辑
data.form.id ? update() : add()
}
const add = () => {
request.post('/article/add', data.form).then(res => { // 新增的对象里面没有id
if (res.code === '200') {
data.formVisible = false
ElMessage.success('操作成功')
load() // 新增后一定要重新加载最新的数据
} else {
ElMessage.error(res.msg)
}
})
}
const handleUpdate = (row) => {
data.form = JSON.parse(JSON.stringify(row)) // 深拷贝一个新的对象 用于编辑 这样就不会影响行对象
data.formVisible = true
}
const update = () => {
request.put('/article/update', data.form).then(res => { // 编辑的对象里面包含id
if (res.code === '200') {
data.formVisible = false
ElMessage.success('操作成功')
load() // 更新后一定要重新加载最新的数据
} else {
ElMessage.error(res.msg)
}
})
}
const del = (id) => {
ElMessageBox.confirm('删除数据后无法恢复,您确认删除吗?', '删除确认', { type: 'warning' }).then(() => {
request.delete('/article/deleteById/' +id).then(res => {
if (res.code === '200') {
ElMessage.success('操作成功')
load() // 删除后一定要重新加载最新的数据
} else {
ElMessage.error(res.msg)
}
})
}).catch()
}
const handleSelectionChange = (rows) => { // 返回所有选中的行对象数组
// 从选中的行数组里面取出所有行的id组成一个新的数组
data.ids = rows.map(row => row.id)
console.log(data.ids)
}
const delBatch = () => {
if (data.ids.length === 0) {
ElMessage.warning('请选择数据')
return
}
ElMessageBox.confirm('删除数据后无法恢复,您确认删除吗?', '删除确认', { type: 'warning' }).then(() => {
request.delete('/article/deleteBatch', { data: data.ids }).then(res => {
if (res.code === '200') {
ElMessage.success('操作成功')
load() // 删除后一定要重新加载最新的数据
} else {
ElMessage.error(res.msg)
}
})
}).catch()
}
</script>
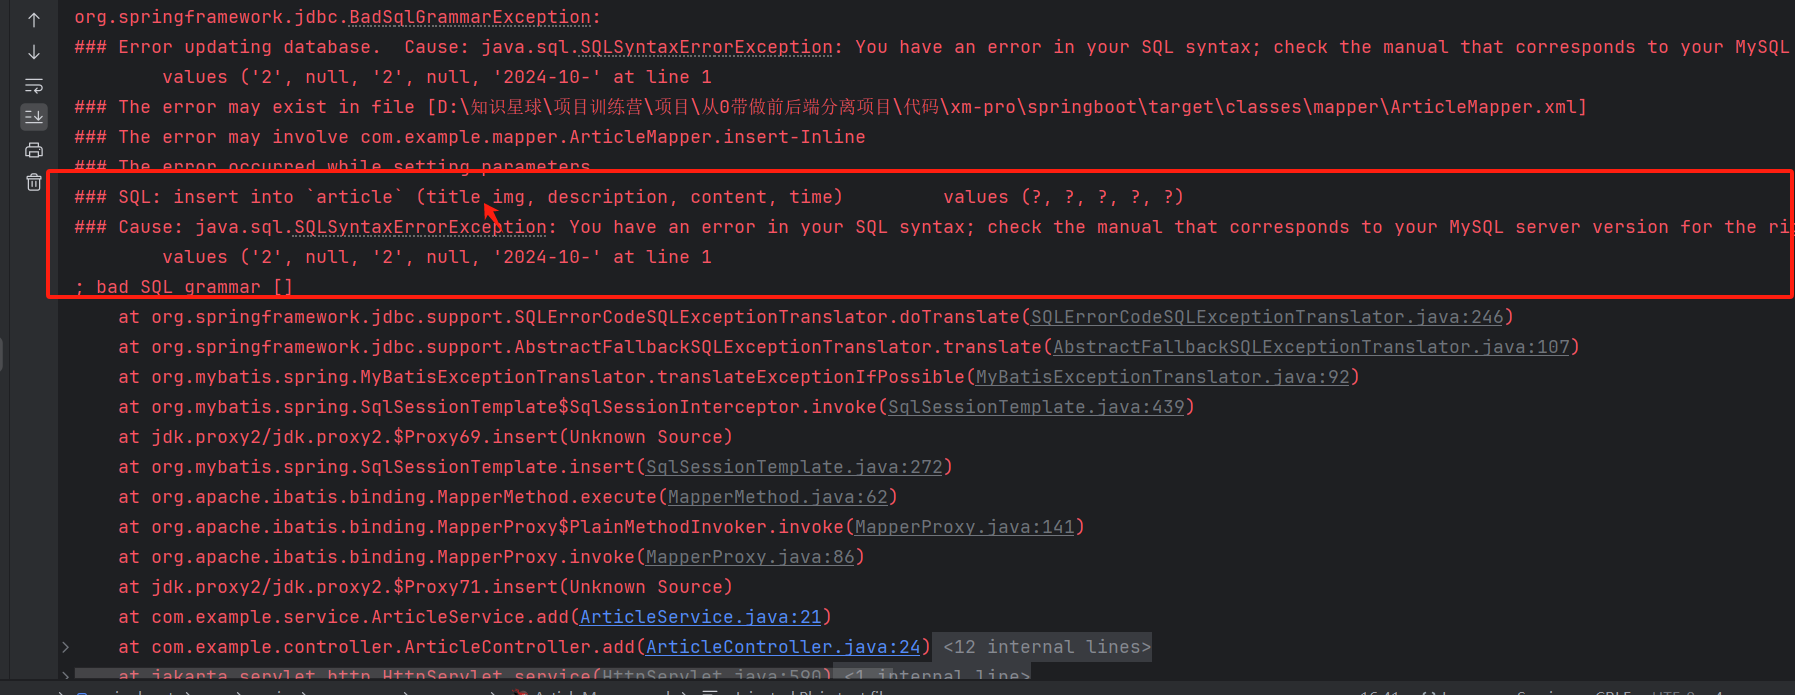
问题:为什么我跟着敲完了 数据没写到数据库里面 页面也不显示数据???
你注意看一下 文件上传的回调方法写的对不对???
注意:复制虽然很爽,但也会经常翻车,属性写的对不对??
如果是后端 sql 问题,要耐心、细心看下你的 sql 到底写的对不对
在表格里面显示预览图片
<el-table-column label="封面">
  <template #default="scope">
    <el-image v-if="scope.row.img" :src="scope.row.img" :preview-src-list=[scope.row.img] preview-teleported style="display: block; width: 100px; height: 60px;" />
  </template>
</el-table-column>